University of Minnesota
http://www.umn.edu/
612-625-5000
http://www.umn.edu/
612-625-5000
Design ◦ Print ◦ Mail ◦ Communicate
Printing Services
Bleed is a term that refers to printing that extends off the edge(s) of a printed piece. Any printed elements — photos, color blocks, text — that bleed must extend 0.125” beyond the trimmed edge of the piece. This additional “bleed” allows the printer to print the piece slightly larger and trim down to the final size, eliminating the possibility of any unprinted areas remaining along the edges of the piece.
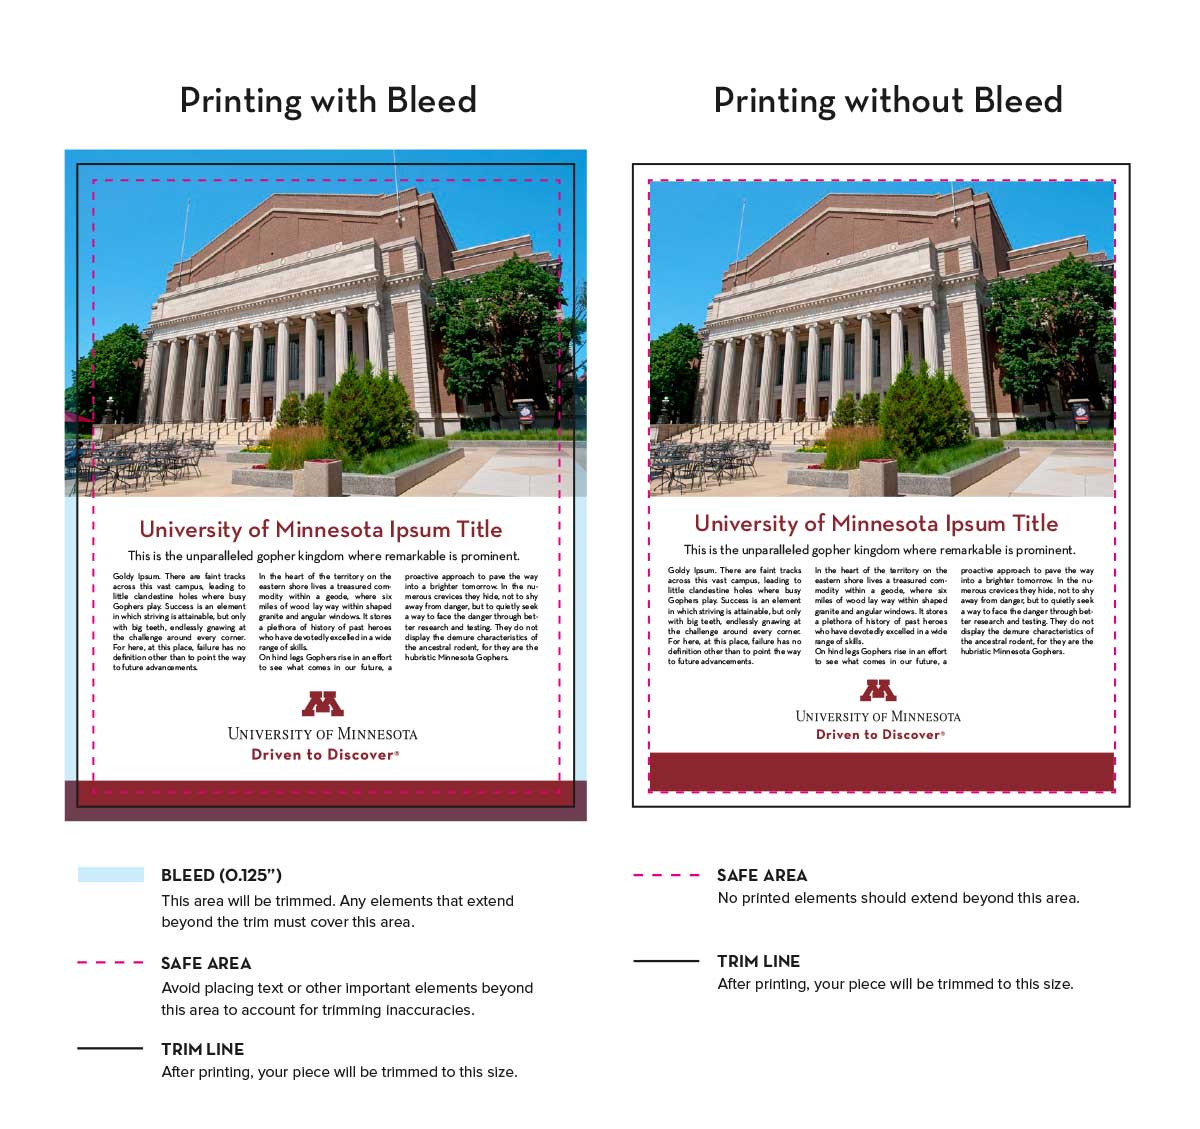
Yes, if any printing extends off any edge of your piece, you need to include 0.125” of bleed on all four sides. See the table below for example file sizes with bleed.
| Project | Final Size | Correct File Setup for Programs that Use “Artboards” (InDesign, Illustrator, QuarkXPress, Publisher) |
Correct File Setup for Programs without ‘Artboards” (Photoshop, Word, PowerPoint) |
| Flyer | 5.5 x 8.5 | 5.5 x 8.5 (with 0.125” bleed setting)* | 5.75 x 8.75 (includes 0.125” bleed) |
| Postcard | 9 x 6 | 9 x 6 (with 0.125” bleed setting)* | 9.25 x 6.25 (includes 0.125” bleed) |
| Saddle-Stitched Newsletter | 8.5 x 11 | 8.5 x 11 (with 0.125” bleed setting)* | 8.75 x 11.25 (includes 0.125” bleed) |
| Poster | 24 x 36 | 24 x 36 (with 0.125” bleed setting)* | 24.25 x 36.25 (includes 0.125” bleed) |
| * Include bleed when exporting PDF (see How to Set Up Bleed and Export PDF Files) | |||
We accept files with or without crop marks. Most importantly, you must include 0.125” of bleed (with or without crop marks). In either case, the .125” of bleed will be visible as part of your preview once your PDF is uploaded.
Yes, when you select your product, choose ‘Yes’ in the ‘Bleed’ dropdown menu. When you upload your file, you will see white border around your image in the preview (this is where the bleed should appear). In the left navigation under ‘Paper Options’, click on ‘Media’. Check the ‘Fit content to paper’ box and click ‘OK’. Your image will be expanded slightly to account for the necessary bleed.
Please note: This will cause 0.125” of your original design to be trimmed off the edges and may cause you to lose important information if it falls too close to the edge. The preview does not visually indicate how much will be trimmed.
This is not the ideal approach to printing with bleed, but may be used if no other option is available.
No, make your file the exact size of your final piece and export (or save) your file as a PDF with no additional bleed. Then, when you select your product, choose ‘No’ in the ‘Bleed’ dropdown menu.
Bleed is created in different ways, depending on whether your software uses “artboards”. See our section on How to Set Up Bleed and Export PDF Files for detailed instructions on setting up bleed in various applications.
How to Order STUDENT Business Cards
Note: If you are using a Sponsored account contact your accounting department for approval before placing an order. Use of this site requires Adobe© Acrobat Reader. If you do not have Reader please click on the link below to download and install it. Then, return to this site to place your order.

